SIMulation Workbench supports the MOXA CP134, MOXA 118, Fastcomm 422/X-PCIe and MicroGate Gtx HDLC serial boards.
The CP134 board provides 4 serial channels, the CP118 board provides 8 channels, and the Fastcomm boards provide either 4 or 8 channels. When the MOXA boards are added to the I/O devices (see I/O Devices...), the number of channels must be edited to be correct.
All the MOXA and Fastcomm boards that are present in the system must be added in the I/O Devices form, even if they are not going to be used by SimWB. This is because the O/S device names to access a particular channel on a board are sequential across all MOXA and Fastcomm boards. I.e. the second channel of the second MOXA board is accessed via /dev/ttyM05 if the first MOXA board is a 4 channel MOXA CP134. So SimWB must know about the existence of the first board in the system even when it is not used. The first channel on the Fastcomm board is accessed via /dev/ttyS4.
The O/S driver for the MOXA boards is provided by the Linux kernel and the module is called mxser. Make sure it is configured in the kernel and loaded before using it.
For Fastcomm boards, the standard O/S kernel driver needs to be patched and a new kernel built. The support package provided by Concurrent will run a script on installation that will patch the kernel automatically.
|
Note: Please refer to the PDF release notes associated with the driver package provided by Concurrent for additional information on installation and extended configuration options.
For Fastcomm synchronous board, i.e. devname = fscc, the board setup IS NOT performed by SimWB via the external stty command. The channels must instead be setup externally after the driver is loaded via the commands; setclock, setfscc, setfeatures in /usr/local/CCUR/drivers/fsccp/utils/bin. The schedPreProcess user-defined script can be used for that purpose. Example:See the associated documentation in /usr/local/CCUR/drivers/fsccp/documentation for more details. |
CS-MX-CP1x.
WCS-MX-CP.
ICS-SWB-1219.
FASTCOMM 422/4-PCIe.
FASTCOMM 422/8-PCIe.
via RIQ.
ICS-SWB-1219.
CS-GS-SIO4BX2x.
WCS-GS-SIO4BX2.
ICS-SWB-1219.
See I/O Mappings... for general concepts on making board and channel settings and creating mappings to I/O points.

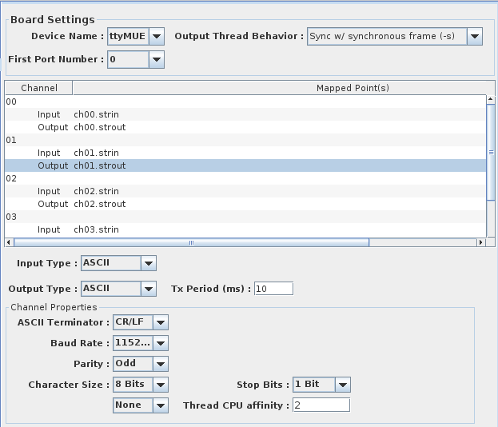
Select whether the device is PCI (ttyMI) or PCIe (ttyMUE). This applies to MOXA only and is not present for FASTCOMM.
Select the lowest numbered port on this device. This applies to MOXA only and is not present for FASTCOMM. So if /dev/ttyMI16 is the desired device, select device name ttyMI for the Device Name and 16 for the First Port Number.
To provide finer control of the behavior of the output, the I/O task provides 3 possible choices:
Select channel and I/O direction. Regardless of direction, channel settings below the channel table may be made on the selected channel.
 To map a string I/O point to a channel, select the appropriate direction (Channel 02 Output is selected in the example above). Any compatible string I/O points will appear in the right-hand panel of the form (see String Points... for details and creating string I/O points). Click on the checkbox(s) next to the point(s) you want to map or unmap.
Type of string data that will be received by the channel. Input and output can be different types.
Type of the string data that will be transmitted by the channel. Output and input can be different types.
Select the baud rate between 300 and 921,600 baud via a drop-down list.
This is for Fastcomm 422/4-PCIe and 422/8-PCIe only. Check box enables and disables custom baud rate. Sample rates of 4, 8, and 16 can be selected via a drop-down list. Custom baud rates can be specified via baud rate dialog box. Note that when custom baud rate is selected, the values chosen supersede the values displayed in the baud rate drop-down list.
Select the parity to use for error detection. The choices are:
Select the number of bits used to represent a character. The choices are:
Select the terminator character(s) for ASCII input or output types. The choices are:
Specify a fixed length for the binary buffer input.
Specify the period of transmission on output channels in milliseconds. The value 0 indicates to transmit whenever the mapped output point changes.
To fully understand this, you must be aware of the asynchronous nature of serial I/O. A synchronous output
task queues data to an async task that actually does the I/O. This task, by default, runs every
millisecond (See output behavior above). This is to match the periods allowed above. However, if the model frame time does not
evenly divide the specified period, the output will be very "jittery" when sent as "transmit on change".
To avoid this, you may add a command option to the asynchronous task (via the I/O Tasks tab in
the Configuration GUI) in question (e.g. moxaasyncio_1, fastcommasyncio_1, etc.). Click on the Options
column and add a "-f". This instructs the task to cycle at the simulation frame rate rather than every
millisecond. This will help with "transmit on change" data, but can add jitter to periodic output which
does not divide by the frame time.
For the MOXA and Fastcomm I/O task,
the individual output channels that are mapped are handled by a separate thread per channel.
This prevents blocking of the output I/O task when one channel
is running at a slower rate than the others or when one channel is "stuck" (Hardware handshake on and no CTS).
When this is given for the channel, the thread will be set run on that CPU.
When
left as -1 (default), the thread will run on the same core as the main I/O task.
Specify the kind of flow control that will be used. The choices are:
The number of stop bits after each byte. The choices are:

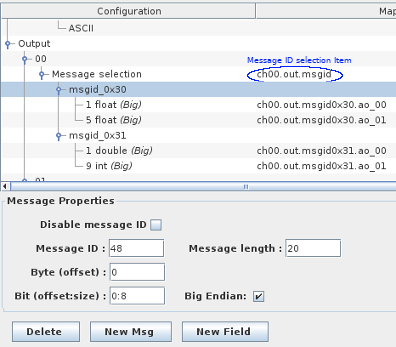
Support has been added to define multiple binary mappings for serial I/O based on a message ID. The message ID is part of the message payload. On reception of a message, the message ID is used to select the mapping to decode the message. The message ID field can be disabled. When disabled, you can map a single binary message to the channel.
An example of a MOXA configuration is provided with the standard SIMulation Workbench distribution. Load the moxa_rtdb RTDB and look at the I/O mapping under Moxa in the filter. The moxa_rtdb is configured for a MOXA CP134 4 channel board where channel 03 is looped back to channel 00 and channel 02 is looped back on itself.
Channel number. There are separate rows for the input and output channels.
I/O point(s) a channel in a particular direction is mapped to.
To map a point to a channel and direction, select a channel’s direction on the left side of the I/O Mappings form, then click on a check box for an I/O point on the right side of the form. See I/O Mappings... for details.

|
Memory | NAK76C2-K6 |

|