CarMaker™ Models
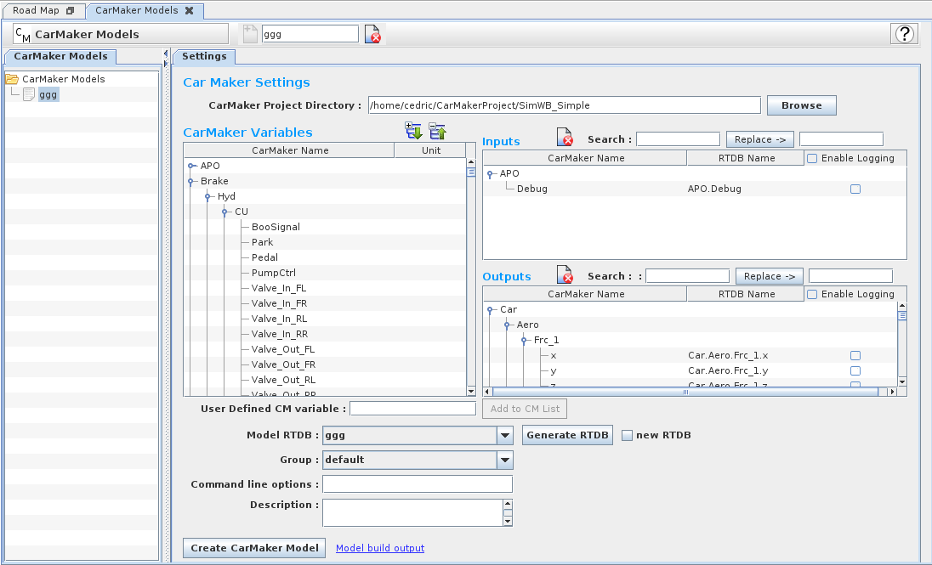 This panel allows you to configure an existing CarMaker™ models so that it will run n a SimWB test.
This will only run under the 64 bit version of RedHawk/SIMulation Workbench.
Configuration Work flow
The typical work flow is as explained below:
Several things need to be configured before end before you can integrate an existing CarMaker model into SimWB.
 Create a SimWB instance of the CarMaker model by entering its name in the field in the tool bar and click
on the button with the folder + icon.
If you want to edit an existing SimWB instance just click on the model name in left most panel containing the list of CarMaker models.
- Specify the folder where your CarMaker model resides on the SimWB system.
This is the folder where you have saved your project under the CarMaker GUI front-end.
This folder typically contains the following sub folders :
 Data
 Movie
 Plugins
 SimInput
 SimOutput
 bin
 doc
 include
 lib
 src
 src_cm4sl
Click on the Browse button the right to navigate to the location of your CarMaker project on the SimWB system.
-
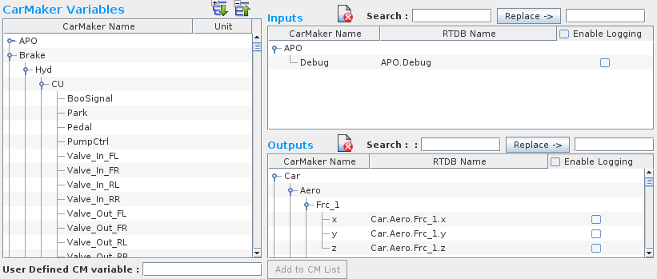 Now, you need to configure the data exchange between the CarMaker environment and the SimWB RTDB.
To do this we associate variables known in the CarMaker model to SimWB
variables that will be created in the RTDB associated with this model.
In SimWB a RTDB item always has a direction associated with it. I.e. it is either an input or an output.
In this instance an input item will provide for data values to be set into the CarMaker model; an output item will be computed by the CarMaker model and set into the SimWB RTDB.
The list of available CarMaker variables is shown in the corresponding list box.
Drag and drop the variable or tree branch from the CarMaker list to either the inputs/outputs list to the right.
Dropping in the inputs list means the value of that
CarMaker variable will be SET in CarMaker from the value of the corresponding SimWB variable.
Conversely, dropping in the outputs list means the associated SimWB item's value will be SET from the value of the corresponding CarMaker calculated value.
Note that the same CarMaker variable cannot be dropped in both the inputs and outputs list. This is a contradiction and is not allowed.
CarMaker vs SimWB Name Space
- CarMaker variable name space is mostly compatible with SimWB. When you drop CarMaker variable(s) into the SimWB inputs/outputs list, the name of the variable
in SimWB will be the same as the CarMaker name. Nevertheless, in some instances, CarMaker has variables like Car.BufferFL.Frc_tot and Car.BufferFL.Frc_tot.q0. Those
2 variables cannot coexist in SimWB as they represent both a branch and a leaf in the SimWB context. Int this case, the SimWB variable would be renamed automatically as
Car.BufferFL.Frc_tot.Frc_tot .
- The second column in the inputs/outputs list shows the RTDB name. You can rename the SimWB variable by clicking on it and editing in place.
- Also , a global rename mechanism exists when using the Search and replace field/button. The action will only be performed on the selected branch in the list.
The search field can be specified as a regular expression ; i.e ^in (the in word only at the beginning of the name). The replace field can include regular expression sub fields
matched in the search box. I.e $1, $2, etc. for the corresponding matching group.
How to Add CarMaker Variables
- Not all possible CarMaker variables are known to SimWB. When using CarMaker user modules that create their own variables, the variable will not
be known but it can be added to the list by entering it in the "User Defined CM Variable" field. This new variable can then be dragged and dropped into one of the inputs/outputs list.
- The list of known CarMaker variables is in the file CarMakeVars.txt stored on the SimWB system in the /usr/local/ccursim/projects/RTDB folder.
You can edit that file to add CarMaker variables that you want to make permanent.
Engineering Units
- The list of CarMaker variables also define the unit associated to each of them. Those unit names are compatible with SimWB engineering unit name. The same unit
variable will be used by the SimWB RTDB item. This is important when using model data exchange where the unit used in one model can be converted to the unit
used by the other models.
Data Logging
- By default, the variables that you create in the RTDB are not logged. You can enable data logging for specific variables by clicking on the
corresponding check box in the 3rd column in the list.
- Once the list of items in the RTDB has been defined, we can create the SimWB RTDB that contains those variables.
You can either append/modify an existing RTDB by selecting it from the combo box or create a new one by checking the new RTDB checkbox.
When clicking on the Generate RTDB button , you will be presented with a dialog to enter the name of the new RTDB.
Warning : Entering the name of an existing RTDB when hew new RTDB checkbox is checked will overwrite the RTDB.
 Optionally, you can also pass parameters to the SimWB CarMaker executable.
- Use the parameter 'display' to set the DISPLAY variable. This display will be used to open the CarMaker GUI. For Example display=:0.1
- Use the parameter 'cpus' to set the cpus that CarMaker GUI will need to use. This can be comma separated or separated by '-'. For Example cpus=0,2-4,6
- Use the parameter 'home' to set the HOME variable. This will be passed to CarMaker GUI. For Example home=/home/praveen
- Use the parameter 'user' to set the user that will run the CarMaker GUI. This is useful if the CarMaker is licensed to a particular user. Also, make sure to set the correct HOME variable. For Example user=praveen
-
 After creating a SimWB instance for the CarMaker model, the Create CarMaker Model button should be enabled. Click on the button to create the SimWB model.
This will copy the src folder from the selected CarMaker project directory to the projects/CarMaker/<model_name>/ folder.
The CM_Main.c file will be edited to comment out the main() function in the file so that it can be replaced by the specific SimWB CarMaker main() function.
The source code will be compiled to produce the model executable. The model executable is always called CarMaker.linux64 and resides in the projects/CarMaker/<model_name>/ folder.
The Create CarMaker Model button will remain selected until the rebuild process is done.
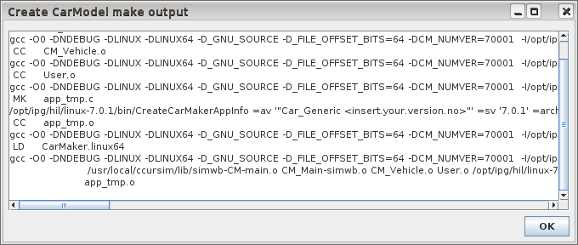
Once the rebuild is done, click on the Model build output link to view the output of the build process as shown in the image to the right.
You can always recreate the CarMaker model by clicking on the button independent of other modification you have made to the configuration for the selected model.
Folder Structure
The CarMaker SimWB model instances are stored on the SimWB host under the CarMaker/<model_name> folder in the corresponding project folder.
If you are working under SimWB project CM, the CarMaker models will be stored in the
/usr/local/ccursim/projects/__projects.CM/CarMaker folder.
All the configuration pertaining to this model instance - such as the association between CarMaker variables and SimWB inputs and outputs variables - is saved in that folder.
SimWB Test Creation
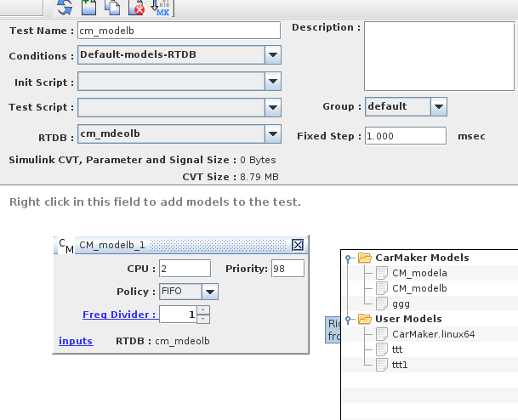
Now that you have create a CarMaker model instance for SimWB, you can create a test.
Go to the test panel and create a test as usual.
When you right click in the model pane,
the list of available models will pop-up. As shown on the image to the right, there will now be an entry corresponding to the CarModel instance you just created.
Running a CarMaker Scenario
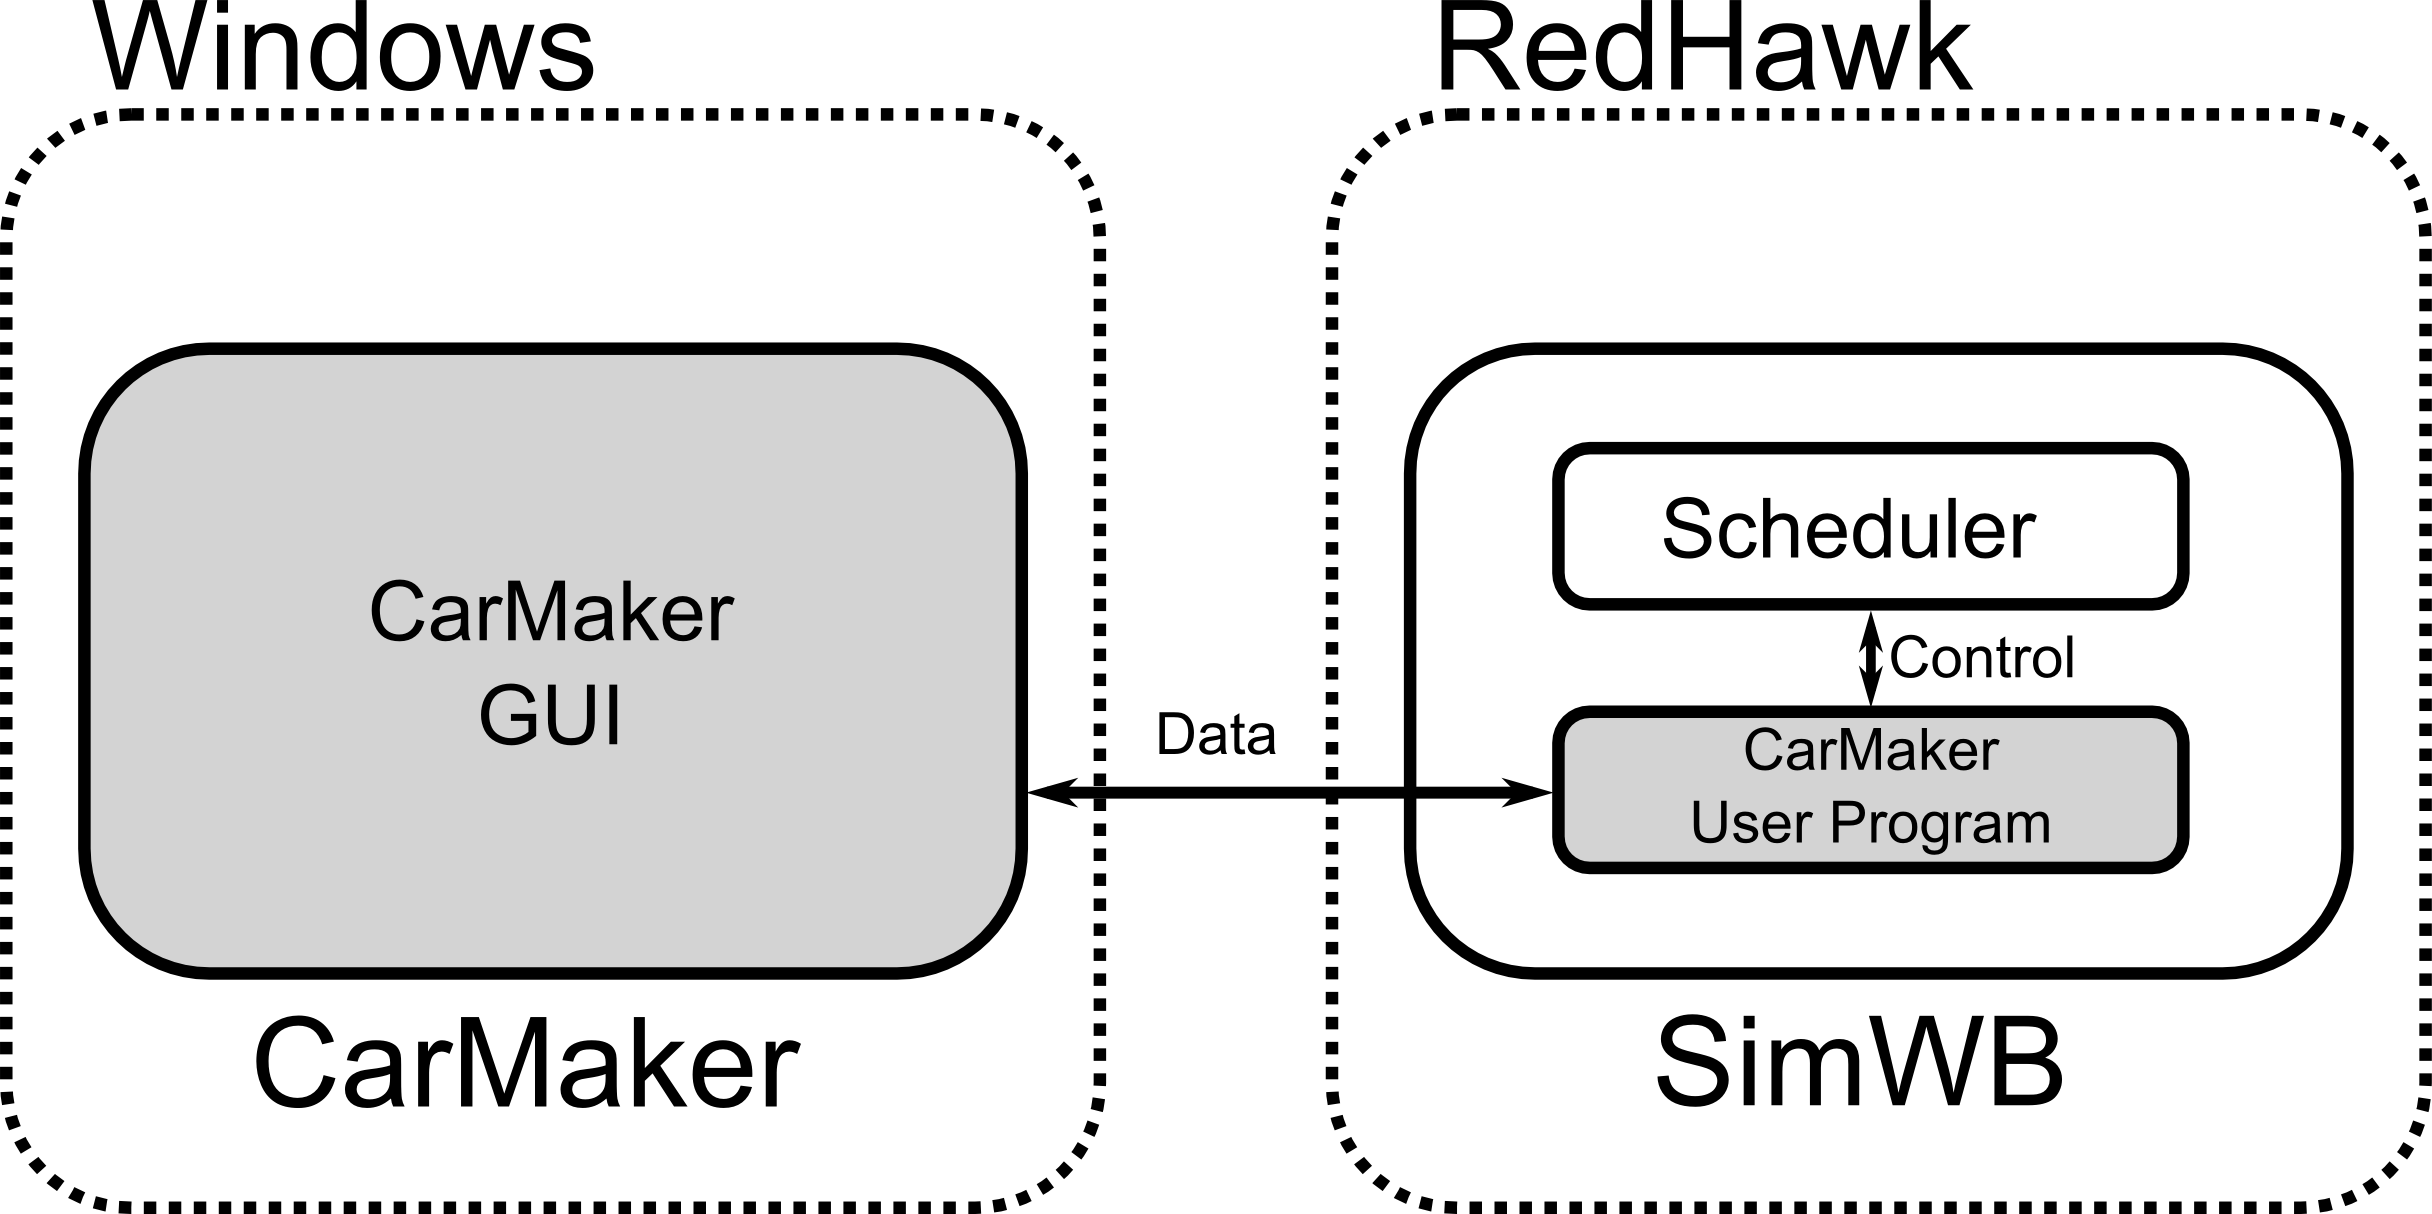
| 1. When you run CarMaker model under SimWB, SimWB scheduler starts the CarMaker.linux64 executable (CarMaker Model)
and the this running executable will need to talk to CarMaker GUI to exchange data. This means the CarMaker GUI needs to be started
by SimWB as well. |
 |
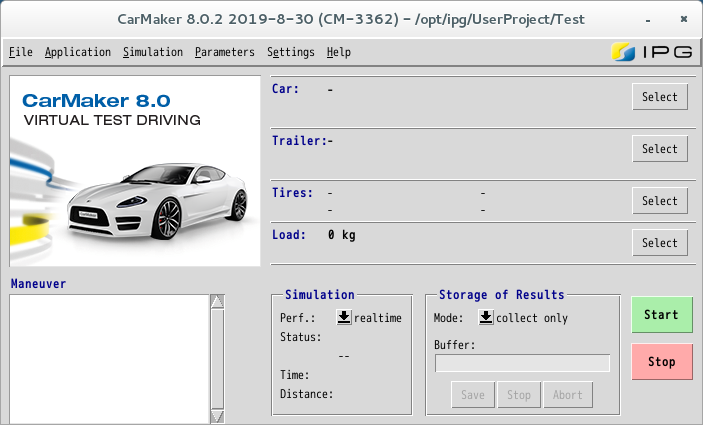
| 2. Before running the CarMaker model under SimWB, please start CarMaker GUI as the correct user (root if you don't specify anyone or the user specified via 'user' parameter)
After opening CarMaker GUI, select the project that you want to run under SimWB. Once the project is loaded, run the test run you want to run in simulation mode as well. This step is
needed because there is no way of remotely changing the project folder in CarMaker. |
 |
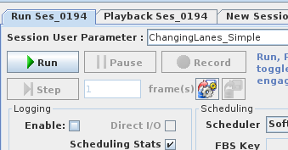
| 3. Now you can switch back to SimWB Control Center. The test run scenario should be under the CarMaker project folder you selected in this panel and under the Data/TestRun/ folder. The same CarMaker model can be used to run many different scenarios, therefore the scenario to use under SimWB is specified not at the test level but within a specific session for the
selected test. When you create a new session for a test that include a CarMaker model, you must specify the scenario in the Session User Parameter in the session panel.
This is a combo box that remembers previous entries specified and should also list the available scenarios for the associated model used in the test. |
 |
|
|
|
|
|
|
CarMaker GUI and SimWB Test Run
Because of the peculiarities of the CarMaker front-end, it is not possible to load a specific project and scenario in the CarMaker GUI and at the same time have the front-end connect to
a user specified CarMaker.linux64 (the SimWB instance in this case) executable.
Hence, when running a SimWB test that includes a CarMaker model, SimWB will start an instance of the HIL.exe executable on the specific TCP port that the SimWB model can connect to. This instance
is restarted every time the test is run.
In order to launch the CarMaker HIL.exe, SimWB needs to know the location for the CarMaker installation. The default location is the
/opt/ipg/hil/linux folder. If your CarMaker is installed in a non-standard folder you can specify that folder by editing the /etc/ccursim.conf main
configuration file and add the following line where PATH_TO_CARMAKER_INSTALLATION is the location where the GUI folder resides:
carmakerinsdir=<PATH_TO_CARMAKER_INSTALLATION>
Corner Controls
Help 
Opens this section of the manual.
 This panel allows you to configure an existing CarMaker™ models so that it will run n a SimWB test.
 This panel allows you to configure an existing CarMaker™ models so that it will run n a SimWB test.
 Create a SimWB instance of the CarMaker model by entering its name in the field in the tool bar and click
on the button with the folder + icon.
 Now, you need to configure the data exchange between the CarMaker environment and the SimWB RTDB.
To do this we associate variables known in the CarMaker model to SimWB
variables that will be created in the RTDB associated with this model.
  Optionally, you can also pass parameters to the SimWB CarMaker executable.
 After creating a SimWB instance for the CarMaker model, the Create CarMaker Model button should be enabled. Click on the button to create the SimWB model.


