 appear in the display builder in the list of user user widgets as shown in the picture to the right.
Have a look a the SimWB file widgetproperties.xml in the $SIMWBINSTALLDIR/SimGUI directory for how to define other properties beyond this example.
The user can extend the functionality of the SimWB HMI GUI by developing their own SimWB HMI widgets.
This is relatively easy if you are familiar with the Java™ programming language and the Swing™ GUI framework.
A small example is provided as part of the SimWB distribution in the $SIMWBINSTALLDIR/SimGUI/addons/UserWidgetsExample directory.
SimWB provides the complete example including the NetBeans™ project file that you can open with the NetBeans™ application.
For more information on NetBeans™, go to the Oracle Java web site.
Three files are needed by the SimWB HMI run-time and display builder application for your widget(s) to be integrated into SimWB.
Those files must be placed in the addons directory under the SimGUI directory in your SimWB installation path. I.e. /usr/local/ccursim/ under Linux™.
This file defines the name of your widget as it will be known in the SimWB HMI application. This is a short name used to identify
the widget in the display files created by the display builder and the HMI run-time.
The file also specifies the fully qualified name of the the Java™ class that implements your widget.
This is an XML file with the following format:
 <?xml version="1.0" encoding="UTF-8"?>
 <library>
     <guiwidget name="square"  classname="com.mycompany.hmiaddons.square"/>
 </library>
The attributes highlighted in blue are the ones that you must provide for your widget(s). The widget name must not include any special characters as Space,
quotes or punctuation characters.
Note the fully qualified class name.
You must add one guiwidget tag for every different custom widget you develop.
This files defines the properties of you widget. Those are the properties you will be able to set in the display builder for your widget.
They also are the properties that will be defined for a widget of that type in the display file when you create a display that uses
your widget.
When creating the widget, the HMI run-time and the display builder will invoke the guiTag() in your widget class so that you can parse the tags and set the properties of your widget.
This is also an XML file. Here is the file corresponding to the examples provided with with SimWB;
<?xml version="1.0" encoding="UTF-8"?>
<widgetproperties>
<guiwidget name="square"  longname="My Square Value" >
    <geometry longname="Geometry">
        <x longname="x" type="int" defaultvalue="10"/>
        <y longname="y" type="int" defaultvalue="10"/>
        <width longname="Width" type="int" defaultvalue="100"/>
        <height longname="Height" type="int" defaultvalue="100"/>
        <layer longname="Layer"   type="int" defaultvalue="1" choices="1|2|3|4|5|6|7|8"/>
    </geometry>
    <colors longname="Colors">
        <operator longname="Operator Override Color" type="color" defaultvalue="red"/>
        <text longname="Text Color" type="color" defaultvalue="black"/>
        <background longname="Background Color" type="color" defaultvalue="#e0e0e0" hasnull="y"/>
    </colors>
    <font longname="Fonts">
        <font longname="Text Font" type="font" defaultvalue="Dialog.10.plain"/>
    </font>
    <border longname="Border Properties">
        <type longname="Type" type="text" defaultvalue="none" choices="none|bevellowered|etchedlowered|bevelraised|etchedraised" />
        <highlightouter longname="Outer Highlight Color" type="color" defaultvalue="white"/>
        <highlightinner longname="Inner Highlight Color" type="color" defaultvalue="white"/>
        <shadowouter longname="Outer Shadow Color" type="color" defaultvalue="#999999"/>
        <shadowinner longname="Inner Shadow Color" type="color" defaultvalue="#999999"/>
    </border>
    <refreshvariable0 longname="Connected Variable">
        <name longname="Variable Name" type="text" defaultvalue=""/>
        <type longname="Variable Type" type="text" defaultvalue="scalar"/>
        <varorder longname="Variable Order" type="int" defaultvalue="0"/>
        <description longname="Widget Variable Name" type="text" defaultvalue="Value"/>
        <rawvalue longname="Raw Value" type="bool" defaultvalue="n"/>
    </refreshvariable0>
</guiwidget>
</widgetproperties>
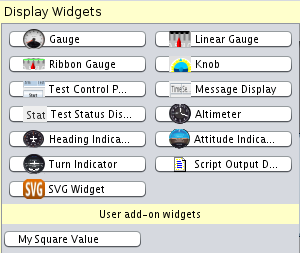
The longname attribute highlighted in blue above is the name that will
appear in the display builder in the list of user user widgets as shown in the picture to the right.
Have a look a the SimWB file widgetproperties.xml in the $SIMWBINSTALLDIR/SimGUI directory for how to define
other properties beyond this example.
This is the Java™ jar file that contains the code for the classes that implement your custom widget(s).
The jar files containing your custom widget classes must be placed in the $SIMWBINSTALLDIR/SimGUI/addons/ directory for the SimWB HMI and display
builder application to find them.
Any jar files found in this directory will be added to the Java™ class path when running the SimWB applications.
Open the project example 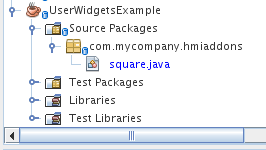 provided in $SIMWBINSTALLDIR/SimGUI/addons/UserWidgetsExample directory.
You should now have a UserWidgetsExample branch in
your projects tree as shown here. This section assumes that you are using NetBeans™ as you development IDE.
provided in $SIMWBINSTALLDIR/SimGUI/addons/UserWidgetsExample directory.
You should now have a UserWidgetsExample branch in
your projects tree as shown here. This section assumes that you are using NetBeans™ as you development IDE.
Notice the package name com.mycompany.hmiaddons corresponds to the class name specified in the user_widgetlibrary.xml file.
The user widget is a subclass of the SimWBWidget. So in order to compile your project, you must add the
SimWB jar files to the libraries for the project. 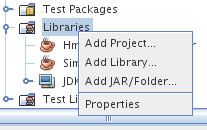 Right click on the Libraries branch in the NetBeans™
project view and select add JAR/Folder; navigate to the $SIMWBINSTALLDIR/SimGUI/dist/lib folder and add both HmiGUI.jar and SimAPI.jar files.
Right click on the Libraries branch in the NetBeans™
project view and select add JAR/Folder; navigate to the $SIMWBINSTALLDIR/SimGUI/dist/lib folder and add both HmiGUI.jar and SimAPI.jar files.
Your widget class must always extend SimWBWidget and implement the RTValueUpdateListener and GUITagHandler interfaces.
So you declare it as follow:
public class square extends SimWBWidget implements RTValueUpdateListener, GUITagHandler
At the minimum you have to implement the widget paint() method so that your widget will display
information in the form you intend.
The paint() method is called by the Java GUI engine whenever a widget needs to be redrawn. Typically you would clear the widget background
and redraw its content according to the values of the RTDB variables connected to the widget.
In the example provided the paint() is implemented as follows:
    public void paint(Graphics g) {
        Graphics2D g2d = (Graphics2D) g;
        if (backgroundColor != null) {
            g2d.setBackground(backgroundColor);
            g2d.clearRect(0, 0, widgetW, widgetH);
        }
        g2d.setColor(textColor);
        g2d.drawString(stringValue, 3, 15);
        paintMyBorder(g);
    }
Notice the check for null background color : when the background color is null, whatever is behind the widget - for instance the display background -
should show through your widget.
The stringValue text contains the variable value. It as been created earlier when the connected variable value changed. See below.
This method is called by the SimWB HMI refresh engine when RTDB variables are connected to your widget. It is called individually for every
connected variable whenever the RTDB value changes. When connecting multiple RTDB variables to a widget, the calls are asynchronous with respect to each other, their
order does not correspond to the order in which the RTDB variables are connected.
The ValueUpdateDescriptor descriptor parameter to the call contains information about the variable such as name, value, data type, etc.
See the API documentation for more information on the ValueUpdateDescriptor object.
This is the implementation from the example:
 public void rtValueUpdate(ValueUpdateDescriptor desc) {
        // This format the stringValue variable used in the paint method.
        // repaint() is called at the end of the method to force the widget to redraw itself.
        prevDesc=desc;
        variableRTFlags = desc.getRtFlags();
        variableCVTType = desc.getCvtType();
        if (variableCVTType == CVTType.CVTTYPE_string) {
            stringValue = BinaryStringFormatter.binaryStringToAsciiFields(binaryStringFormat,desc.getEncodedStringValue());
            variableStringValue = stringValue;
        } else {
            variableCVTValue  = desc.getDouble();
            System.err.println("Got value:"+variableCVTType);
            variableAltValue = desc.getAltDouble();
            if (variableCVTType == CVTType.CVTTYPE_float || variableCVTType == CVTType.CVTTYPE_double) {
                try {
                    stringValue = String.format(textFormat, variableCVTValue);
                } catch (IllegalFormatException e) {
                    if (disBuilderObject) {
                        variableCVTValue = 0;
                        stringValue = "0*";
                    } else {
                        stringValue = "Bad format " + textFormat + " !";
                    }
                }
            } else {
                long longCVTValue = (long)variableCVTValue;
                try {
                    stringValue = String.format(textFormat, longCVTValue);
                } catch (IllegalFormatException e) {
                    if (disBuilderObject) {
                        variableCVTValue = 0;
                        stringValue = "0*";
                    } else {
                        stringValue = "Bad format " + textFormat + " !";
                    }
                    stringValue = "Bad format " + textFormat + " !";
                }
            }
            previousValue = variableCVTValue;
            previousRTFlags = variableRTFlags;
        }
        repaint();
    }
This method is called by the SimWB HMI engine when loading a display. The widget must use this method
to decode its property tags from the display file. This method must decode all the tags that are specific to the widget.
Default tags in the following list are decoded by the superclass method:
      <geometry
      <border
      <font:  which sets the textFont object to the Corresponding Font object.
      <colors
           <text:      textColor is set to a corresponding Color object
           <background: backgroundColor is set to the corresponding Color object.
      <background
           <image:  sets backgroundImageFile to the image file name. This file can be a PNG,JPEG or SVG file.
                     backgroundImage is set to an Image object
                     hasBackgroundImage is set to true when an image file has been specified
      If you add any additional XML properties under those main tags - font, colors background, you will need to parse/decode
      them in this guiTag method.

      You will use all those properties to render your widget in this widget paint method.

      <refreshvariableX : Decoded internally
This method is also called by the display builder application whenever the use updates any widget properties.
The user must called the super class method via super.guiTag(uiWidget) at the end of the method.
A typical implementation would be:
   public void guiTag(UIXMLWidget uiWidget) {
        //System.err.println("NumericValue tag handler");

        HashMap tagProp;
        Iterator p;
        Iterator e = uiWidget.getTags().iterator();
        while (e.hasNext()) {
            String tag = (String) e.next();
            if (tag.equals("text")) {
                tagProp = uiWidget.getTagAttributes(tag);
                p = tagProp.keySet().iterator();
                while (p.hasNext()) {
                    String propName = (String) p.next();
                    String value = (String) tagProp.get(propName);
                    if (propName.equals("format")) {
                        textFormat = value;
                    } else if (propName.equals("align")) { // This is just an example, it is not used in the paint method
                        if (value.equals("left")) {
                            align = TextAlignment.AlignLeft;
                        } else if (value.equals("center")) {
                            align = TextAlignment.AlignCenter;
                        } else if (value.equals("right")) {
                            align = TextAlignment.AlignRight;
                        }
                    } else if (propName.equals("valign")) {
                        if (value.equals("bottom")) {
                            vAlign = TextAlignment.AlignBottom;
                        } else if (value.equals("center")) {
                            vAlign = TextAlignment.AlignCenter;
                        } else if (value.equals("top")) {
                            vAlign = TextAlignment.AlignTop;
                        }
                    }
                }
            }
        }
        super.guiTag(uiWidget);
    }

|
Script Output Display |